Tuesday, May 13, 2014

#pizzacake

No, this isn't about one of those fancy birthday cakes that look like toys, TARDISes or pizzas. This is about a birthday cake made of pizzas, a terrifying and fascinating invention by Boston Pizza featured on their Pizza Game Changers website. Mine doesn't have as many layers and isn't as regular (although I planned to make it quite regular using an actual cake form, but I didn't account for the proofing and growing and stuff), but, mind you, this is a result of the first attempt.

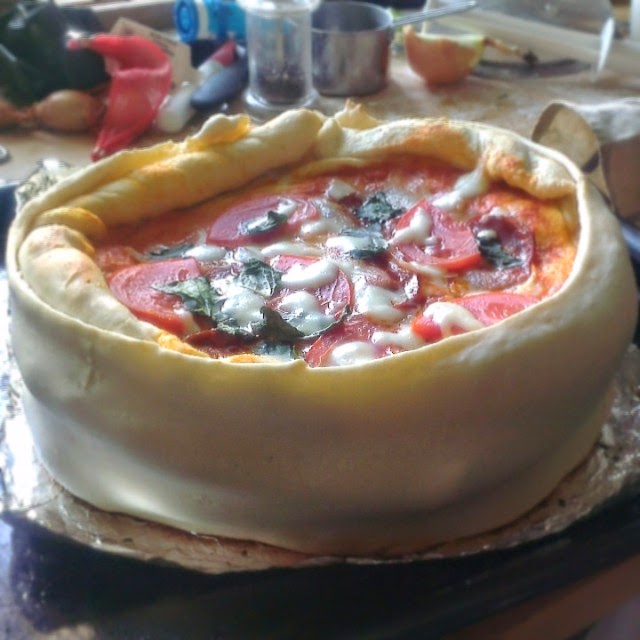
When I first saw Boston Pizza's Pizza Cake I asked the many pizza-crazed pizza-loving pizza-maniacs I know who's birthday is coming first and decided to make it for that occasion. The day came on Saturday and since I'm a woman of my word, here's my pizza cake.

I used Jamie's pizza dough recipe, which allowed me to make four small pizzas and a ring to bind them (had some dough left). No need to get into details about the sauce and decoration - I tried not to use too much topping so that the layers don't collapse under the weight.

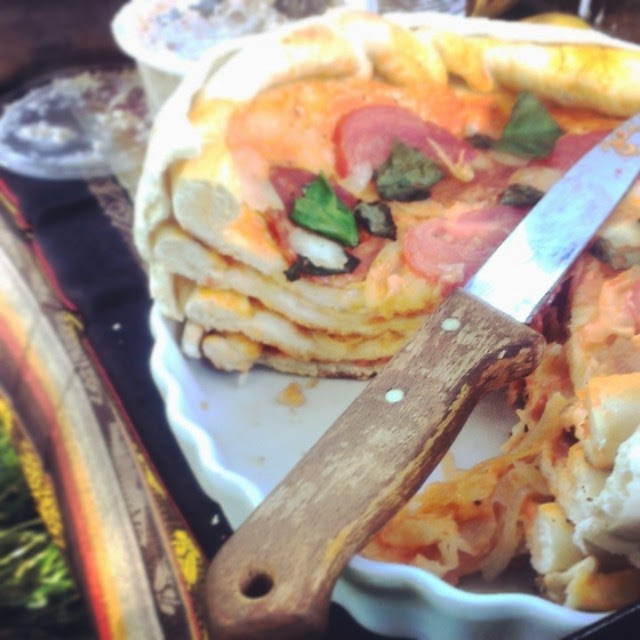
I baked every pizza separately for a few minutes, a bit shorter that I would bake a single pizza, also making the base a bit thicker than I normally would. The one that goes on the bottom was baked for the shortest time, as it's the one most exposed in the final stage. Then I stacked the pizzas and wrapped them in the leftover dough. If I wasn't in such a hurry I'd let it proof for a while in that state, before putting it back in the oven. Also, the next time I think I'll use some mozzarella to bind the pizzas and the dough around them. Anyway, this is what came out.

It doesn't look great inside, because I used rather flat toppings, that don't support the layers on top, unlike it was apparently done (?) in the original idea. Also, transporting it included some running and about 1,5 hour passed between taking it out from the oven and slicing it so it dropped a bit.

Still, I'm pretty proud of it and everyone seemed to enjoy it.

Disclaimer: this post may be a bit chaotic, sorry for that, the spring has really gotten to my brain

Saturday, April 12, 2014

almost tinga de pollo and mango guacamole


Of course the day I decided to go Mexican had to be the day when my fiancé, who works in a Mexican restaurant, went on a week-long road trip to shoot a movie. So there was no response when I asked him "how do you make tinga de pollo at work?". So I had to rely on a recipe from Epicurious and, unfortunately, the limited supplies of the Polish suburbia.

This recipe is pretty good, but I call what came out from that "almost" tinga de pollo, because I couldn't find chipotle en adobo within a 5km radius from my parents' house and I had to use marinated jalapeños. It still turned out great. I served it with mango guacamole, which is totally amazing, especially with such great ingredients as we had:


  • 1 super ripe avocado
  • 1 ripe mango, diced
  • 1 small chili pepper
  • juice from 1 lime
  • chopped fresh cilantro

Using a spoon scoop the avocado out from its skin and squash it in a bowl using a fork. Add the rest of ingredients, mix thourougly. The end.

Thursday, April 10, 2014

seasonal: grilled asparagus with oyster mushrooms


Finally! Spring! Asparagus!

This is a quick one - I trimmed and scrubbed the asparagi (I love to think this is the proper plural form) and grilled them with a dash of unfiltered olive oil, some salt and freshly ground black pepper.
At the same time I sliced the oyster mushrooms, chopped a large shallot and fried them on butter until they relinquished all liquids (also with salt and pepper). Voila!

You can't see it on the picture, becuse the dish was already a mess when I figured it out, but parmesan shavings really bound it together, elevating it from different ingredients thrown on a plate to a proper dish.

Sunday, April 6, 2014

Coconut Lime Mussels


Friday night I made Coconut Lime Mussels from this recipe at epicurious.com, turned out pretty well, my mussel-loving friend said they were amazing (she took the photo). I'm still on the road to get convinced to shellfish.

Thanks to Marta I also discovered the Vivino app, which we used extensively that evening. So cool!

Wednesday, March 19, 2014

Sunday, February 16, 2014

originals - the lazy Moroccan shepherd's pie

Ever more often I find myself creating my own recipes, and not working on someone else's. This makes me very happy, as does every sign that I'm capable of more than just recreating things. This is one of those recipes.

The backstory on this one only proves that laziness is the mother of invention. I had some minced lamb, didn't feel like going through all the fuss of making kołduny (especially since I had them a week before) and most definitely - was not ready to buy, peel and mash potatoes to make a shepherd's pie. But the general idea of shepherd's pie didn't seem so stupid. Why not substitute the potatoes with something faster to make? At that point, why not make it all taste better?

ingredients:
  • 600g minced lamb
  • 100g dates
  • one big pear
  • some chilli finely chopped peppers (I leave the amount and the matter of the seeds to your preference)
  • 300 ml red wine (something heavier, a shiraz perhaps)
  • 200 mg cous-cous
  • 1 cinnamon stick
  • few cardamom pods
  • salt, pepper
As usually, start with pouring yourself a glass of wine and some more, about 150ml to another small glass. While enjoying the wine you've chosen, chop the dates and throw them into the other wine filled glass to soak for a while. The dates will expand a bit, get more moist, and the wine will become sweeter. 

In a bowl season the minced lamb generously (mostly with pepper, but also with salt) and mix it well with your hands. Minced lamb has the tendency to clump and never fall apart, and then the flavours don't get through well. 

Heat some olive oil in a tagine pot - if you don't have one, just take a heavy, oven proof skillet that you can cover - it's pretty important for this recipe not to let too much fluids evaporate. On mid heat, start cooking the meat, adding the chopped chilli, cinnamon and cardamom. Meanwhile peel and dice the pear. Add it to the meat together with the dates and the wine they soaked in. Stir everything well, try to break apart any bigger lumps of lamb, cover and let simmer for some time.

Heat the oven to about 200C/400F/gas mark 6. Get yourself another glass of wine and prepare the cous-cous. Put it in a bowl and add to it the juices from the lamb. Then, add the remaining wine and some boiling water - about half of the amount mentioned in the instructions on the packaging. Cover it and let it "cook".

Now, the semi, pseudo "shepherd's pie" part. Distribute the lamb evenly in the skillet and cover it with an even layer of cous-cous. Put it in the oven and cook (uncovered) until the top is golden-brown. It depends on the oven and many other factors, but, let's say, start checking in on it after about 15 minutes. The top should be a bit crunchy and so should some bits of the lamb at the bottom and the sides.

If you still have some wine left, totally serve it with it. If not - shame on you for not buying more. Anyway, I liked it a lot and was told it's seriously good. Hope you think so too, enjoy.

Thursday, January 9, 2014

originals: the Ruskies experiment


After a good run of making ruskies, I found myself with a couple of ingredients I didn't know what to do with. I made this amazing moroccan-style vegetable and chickpea stew (from The First Mess) for my fiancé's mother's and sister's birthday (I was looking for something vegan and gluten free to accommodate for everyone's needs) and was left with a couple sweet potatoes I never used before in my kitchen. So the idea came - let's make ruskies with sweet potatoes.


Long story short, I decided to substitute the regular onion for red one and the quark for smooth goat cheese. The red onions are slightly sweeter than regular ones and goat cheese works well with sweetness and balances it awesomely (I didn't want to make a dessert, after all). I think I did just fine, thank you. So the filling is:
  • 200 g sweet potatoes, cooked, pureed
  • 200 g white goat cheese (if given a chance, use one that's a bit harder, more like feta)
  • 100 g red onions, chopped finely
  • butter
The rest goes basically the same as with the ruskies - melt butter, cook onions (but not too much, let them be a bit crunchy, this makes the bite more interesting with different textures and stuff). The dough is the same, only this time it's additional point is that it's almost translucent and the pierogis look preeeettyyyyy (colours!). I make these smaller than regular pierogis, so I use something slightly smaller than a regular glass to cut out the circles.


They are pretty flavourful, they can work as a single dish, but they're also awesome as a side, which I tried out with steak and basil sauce. Enjoy!

Wednesday, January 8, 2014

- who asked for the Ruskies? - no-one, they came uninvited

It could seem that unemployment (self-employment, as we're calling it in Poland) would result in an increased frequency of posts on this blog, but, truth be told, the lack of structure to run away from has proven to be just that - lack of structure. But I didn't stay away from the kitchen. I just lacked the concentration to write about it.

This is the first of two posts documenting an experiment I made, and it's about the base. Lack of jobs equals lack of money, so I was trying to come up with something cheap that will last for many days. I thought of the cheapest kind of pierogi - the ruskies. The great thing about pierogi is that once you make a shitload of them, you can freeze them before cooking and eat them for weeks to come.

The recipe is pretty simple and the results are great. The unique thing about this kind of pierogi is the dough. It's a bit like magic, watching how gluten works and stuff:
  • 1 glass of all-purpose flour
  • 3 tbs of vegetable oil
  • salt
  • 1/2 cup of boiling water
See? Cheap, it doesn't even need egg. Mix the flour with the salt, add the oil, mix a little and then add the boiling water and, watching the amazing transformation, work the dough until it becomes a smooth, even ball, no clumps etc. It can be hard at the beginning (hooooot), but push through it!

The filling is more time consuming (unless you have a batch of cooked potatoes - the ruskies are a great leftover dish), so, actually, it's good to start with that. (The amounts are for a rather small batch).
  • 200 g fat quark (the Polish type - twaróg)
  • 200 g cooked, pureed potatoes
  • 100 g onions, chopped rather finely
  • 3 tbs butter
  • some salt, lots of freshly ground black pepper
In a heavy pan melt the butter and slowly cook the onion until it's translucent and golden. In a large bowl combine the potatoes and the quark, then add the onion (try to get as much of the melted butter from the pan as possible, the filling will be a bit smoother and tastier then).

The rest is simple, turn on a good show on your laptop, roll out the dough (it's good to divide it in four parts, rather than roll it out all at once, and always remember about sprinkling some flour on the table and the rolling pin), cut out circles with a regular glass and make pierogis until you're have no more filling. Cook in salted, boiling water until they all float to the surface. Serve with fried chopped onion (like you used for the filling).

That's it when it comes to the ruskies. The next post will be about my own, new version, that I don't know how to call. Yet.

(The title is the punchline from a Polish communist era joke. It goes something like this: a cook in a bistro calls out "uskie!" - no one answers - after a while she calls again "ruskie!!!" - still no answer - after a couple of times she yells "who asked for the Ruskies?!?" and finally someone answers "no one did, they came uninvited")